Tuesday, July 17, 2012

imPRESS Press On Manicure

imPRESS Press on Manicure nails- Review + Reusing Tip:
i tried the imPRESS on nails out in a gorgeous bright purple-pinkish color loved it, they were given to be for free by influenster (a website where ANYONE can sign up to recieve and review amazing products) the adhesive lasts a LONG time, however i find that the actual "enamel" doesnt last as long it shows wear after about 3-4 days. I loved the product would love to try it out again however not worth the Suggested retail price: $5.99 for colors and $7.99 for patterns.


You can find imPress Manicure at CVS, Rite Aid, Duane Reade, KMart, Walgreens, Walmart
visit imPressManicure.com


Disclaimer: I received the imPress Press on Manicure Nails free to try out and review from Influenster (influenster.com) .(featured in the 2012 mom voxbox)


great way to reuse? - 1. start the nails out long, than as they show wear cut them down little by little this way they look fresher longer. 


- 2. after using it and removing it remove the adhesive. later when you want to apply it on again apply nail glue or perhaps double sided tape??? (never tried that before but willing to give it a try) then freshen it up with a fresh coat of nail polish in your desired color and of course apply a top coat.


Saturday, June 02, 2012

D.I.Y- Redo Oatmeal Can with Fashioned Duck Tape

currently using it to store cords (below)


A Cute Way to Reuse a Sea Shell

                                            store you everyday jewelry for easy access
 plz COMMENT, RATE, and  FOLLOW!

plz click on the ads at the side to help support my blog and youtube channel. 

Never to Late for Christmas Lights

Changed it up again, thought this looks better
Plz comment telling me what you all think and feel free to ask any questions that you all may have


plz COMMENT, RATE, AND FOLLOW

please also click on the ads on the side to help support my blog and youtube channel.

DIY- Corner Bookmark


-Tutorial coming up..will post a youtube video soon

MATERIALS:
-Paper/ Cardstock Paper
-Magazine, Decorative Tape, Contact Paper, Decorative Paper (Use this to decorate your Paper/Cardstock Paper)
- Pencil/Pen (to mark up the paper that you will then cut accordingly
- Ruler
-Razor/Scissor
-Clear Tape (optional) (I used it to tape the corner bookmark to add durability)
-Glue 

PROCEDURES:

-coming up soon


plz comment with your feedback and questions. Plz follow my blog.


-plz help support my blog and my youtube channel by clicking on the ads on the side of the posts.  

How to Make a Cardboard Chandelier


this is what the printed out templates should look like (above)
 

STILL IN PROGRESS, PAINTING THE BACK OF THE CHANDELIERS, ONCE DONE, I WILL POST A PICTURE;)
                    Template 1: http://www.etsy.com/blog/en/files/2012/04/Chandelier_templates-11.jpg 
                    Template 2: http://www.etsy.com/blog/en/files/2012/04/chandelier-template2.jpg
                    Template 3: http://www.etsy.com/blog/en/files/2012/04/Chandelier_templates-3.jpg
MATERIALS:
-Cardboard (you need a medium-large box)
-Tape/ Super Glue
-Paint (Acrylic)
-Paint Brush 
-Razor/Scissors
-Strong Wire (to hang the Chandelier)
-Glitter or any other decorating material (optional)

PROCEDURES:
1. print the templates in full size
2. Follow the instructions on each template
3.. flatten out your cardboard box, trace the templates.
4. cut out the tracings with a razor or scissors
5. tape or glue the traced and cut cardboard pieces together
6. find a clear area to work, spread newspaper or grocery bags to keep your area clean and take out a paintbrush, begin painting your chandelier. 
7. wait for it to dry, make sure you do both sides and fit the two chandeliers sides together
8. use hot glue gun or super glue to stabilize it, use strong wire to hangup the chandelier


PLEASE COMMENT WITH YOUR FEEDBACK, ASK ANY QUESTIONS YOU MAY HAVE, PLEASE FOLLOW MY BLOG. 


-click on the ads to help support my blog and youtube channel. 

Retro Cheetah Nails for Summer!


 if you wish for a tutorial comment below this post;)
tell me what you think

Thursday, May 10, 2012

Operation Smile

Operation Smile: Spread the Smiles! Like Operation Smile on FB to see how you can help kids smile. http://on.fb.me/IKxw0E #OperationSmiley360 *Please remember the FTC requires you to mention that you received a free sample courtesy of Smiley360 when sharing.

Wednesday, May 09, 2012

Sharing Smiley360 Mission

Sharing Smiley360 Mission: I just became a Smiley360 member! Sign-up for free at http://bit.ly/lTDqVw Be heard. Be happy. *Please remember the FTC requires you to mention that you received a free sample courtesy of Smiley360 when sharing.

Saturday, May 05, 2012

Super Cheap and Easy Way to Clean-Up Pet Hair

Most useful for cleaning up furniture.
Materials needed:
-Paper Towel or a piece of old cloth
-Water

1. soak the paper towel or the piece of cloth in water. (it shouldn't be too dry or too wet.)
2, wipe the furniture with the paper towel several times and the water from the cloth or paper towel will attract the pet hair.

Let me know if this worked for you in the comments sections

-it worked for me when i cleaned my lounge chair that was full of pet hair (cat) next time I use this method ill make sure to make a video. More posts coming up soon.


Tuesday, March 20, 2012

Fashion Duck Tape Decor

Walmart in my opinion has the cheapest fashion ducktape ($3.50). Even on eBay theu were $8-$13!!

Decorate
Pens/ pencils
Notebooks
Photo frames
Light switch frames
Make braded bracelets
Faux feather earings/ necklaces
Make fashion duck tape wallets
Pencil cases
Bookmarks
Regular bracelets/rings
Labels
Name tags/luggage tags
Etc. The possibilities are endless

I made some over the last couple weeks using zebra striped duck tape (unfortunately the only one I have the walmart isn't close to where I live). PICTURES WILL BE POSTED SHORTLY once I find free time

Thanks and plz click the ads to help support me. :) donations are welcomed


Monday, February 13, 2012

Decorating/Organizing Your Work Space

 Decorate and Organize your work Space with Locker Shelves
Reuse your old ones for example 
Hide it behind you desk if you want

Decorating/Organizing Your Work Space

Yup thats me lol
Materials Used :
  • Cardboard Paper, or any type of Paper that is just what I used
  • Decorations (optional: such as a red festive bow)
  • Paper Clips or Binder Clips, or Magnets
  • Metal Wire, or String
  • A way to attach the ends (optional: a nail. tape, etc)

Make a small Notepad out of Old paper scraps

  • Material Used:
  • Scrap of Paper (mixtures of graph paper, computer paper, loose leaf paper etc).
  • Old String (optional)
  • Old Hollister Coupon (that is what I used because of the cute dog, you can use anything such as a hand drawn picture or a hand drawn design or any picture
  • Tape
  • Stapler with Staples 

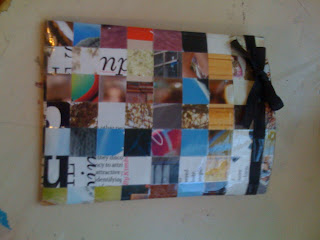
Recycle Paper- Decorate anything with cool Retro Checker Pattern


Weave paper, magazines, newspaper, etc into awesome and unique retro checker patterns of any size. have a variety of different sizes of strips of paper for different effects. hang it up on your wall, decorate notebooks, binders, anything.


<----- a pad holder, can be used as a post-its holder or money/ coin holder just add a zipper
made with weaving magazine strips together on top of a cardboard paper and then taped into the desired formation.
the taping laminates it and makes it more durable
a tutorial will be made shortly

Tip: Decorating Dull Notebooks


sorry everyone that the pictures are not aligned properly but this is just a collage laminated with tape which is for binders, planners, notebooks, etc.

Saturday, February 04, 2012

D.I.Y- Simple Valentine Day's Nail Tutorial


 Materials used:

  • Nail Polish Remover
  • Bright Red Nail Polish
  • Black Nail Polish
  • White  Nail Polish
  • Tan Nail Polish (optional: can be any color you desire)
  • Glossy Top Coat/ Glittery Top Coat (optional)
  • Cotton Balls
  • Dotting Tool (old White out pen that dried out worked fine for me)
  • trident white or any gum that has the plasic packaging shows in the picture (above left)


turn a string of yarn into a simple casual ring


PAPER BEAD Jewlery


cute (w/ scissors or razor) strips (rectangular) of paper from any magazine with any pattern you desire and any length you desire and twist it (a pen tube like the one in the picture at the left can help alot when it comes to the twisting part, then use glue to glue the end of the paper.


once you have a desired number of paper "beads" attach them together with needle and thread or strong glue. make necklaces and bracelets with and strong string you may have 

Wednesday, January 04, 2012

Decorate Boring Bed

NEW TOMMY HILFIGER BEDDING GOT IT ON RUE LA LA.
WOULD LOVE TO HEAR ANY COMMENT SAYING WHAT YOU THINK OF THE NEW BEDDING. 
                                                                                                                     
ANYWAYS....MAKE BORING BED STAND OUT A BIT BY ADDING (CUTE TOYS- a bit childish i know), PILLOWS, AND THROWS AS SEEN ABOVE. 

Decorate Simple Curtain

add a nice decorate (small or big) to your curtains in the picture above i attached a scented shoe ornament that is used for decorate you can do something like that or something more creative you can bejewel your curtains, buy fabric paint and paint it, or attach cute ribbons, etc. (BUT MAKE SURE ITS OK WITH YOUR PARENTS IF YOU ARE STILL A CHILD/TEEN YOU DON'T WANT TO RUIN AN EXPENSIVE CURTAIN.)

Saturday, December 31, 2011

Dressing up boring $1 Candles into Cute Holiday Candle Centerpieces

Dress Up regular, boring, dollar store candles into cute holiday centerpieces with:
  • Real/Fake Pine Cones
  • Candle Holder
  • Real/Fake Pine Tree Branches
  • Ribbons
  • Bows 
  • A bit of Artificial Frost
  • And anything personal/festive (glitter?)
BUT REMEMBER WHEN DECORATING CANDLES BE CAREFUL TO AVOID FIRE. KEEP DECORATIONS AWAY FROM FLAMES. TRY TO ONLY DECORATE THE CANDLE HOLDER 

Friday, December 30, 2011

Glam up Your House for the Holidays (Christmas/New Year)


Glam up your house for the Holiday Season don't be afraid to unleash your creative side.

D.I.Y- Transform Old, Ugly, Unused School Supplies Holder into a Plant Pot

(Project Still in Progress-Not Complete) Old School Supple Holder no longer used can be transformed into a Plant Pot

Instructions:
  1. Drill or Solder holes at the bottom
  2. (optional: find a way to remove sections, mine has sections and they are securely placed inside so i am still currently trying to find a way to get the removed)
  3. place soil inside
  4. plant seed
  5. place dish (recommended)
  6. place in appropriate environment
  7. enjoy as you watch your plant(s) flourish

D.I.Y - Transform Cheap Dull Frame into a Personalize Room Decor

Personalize Room (Walls or Furniture) by getting an old frame ($1?) and tissue paper, patterned paper (wallpaper, printed picture, photos, jewels (cheap $1 ones are fine), adhesive paper (w/ stencils perhaps), its up to you) personalize it further by perhaps adding you Name? Quote? First Letter of Name? Photo? etc.